Everything you need to scan a code, reshape what it says, and generate a new one — from your first template to serial batch runs.
Covers QR Remix 1.2.4 for AndroidJump straight to the part you need
QR Remix is organised around the four tabs at the bottom of the screen
Open the camera and read a code. The decoded text appears here, ready to be used in a template.
Compose the output you want from pieces of the scanned code, fixed text, and Smart Fields. Save templates and pick which one is active.
Shows the newly generated QR code or barcode together with the exact text it contains.
A history of everything you have scanned and generated. Any past scan can be sent back into a template.
Three other parts of the screen are worth knowing before you start:
A worked example that turns a supplier code into a short shelf label
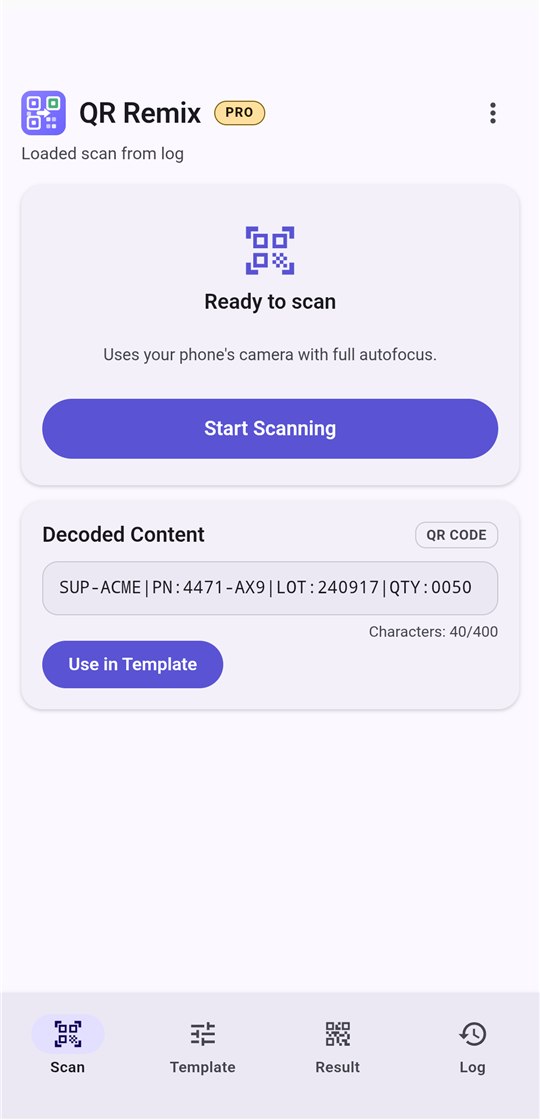
Suppose a supplier's QR code contains SUP-ACME|PN:4471-AX9|LOT:240917|QTY:0050, but your shelf labels only need the part number with a warehouse prefix: WH1-4471-AX9. The five steps below build a template that does this for every code you scan.
WH1-4471-AX9-0001. Leave out the extra dash and serial segment to get WH1-4471-AX9.
You need one scanned sample so that you can point at the characters you want to keep.
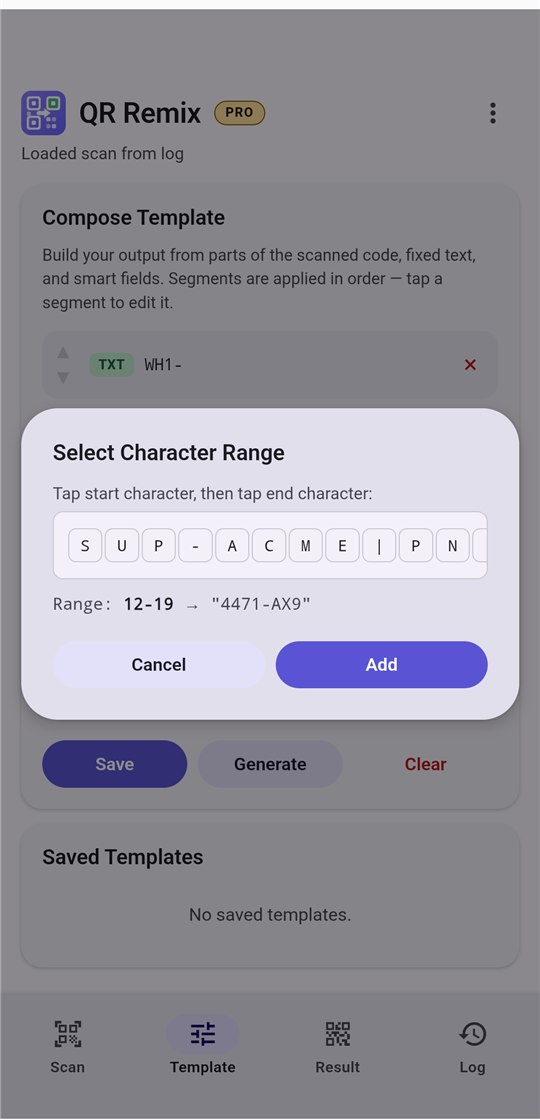
WH1-, and tap Add.4), then the last one (the 9). The range and the selected text are shown underneath.
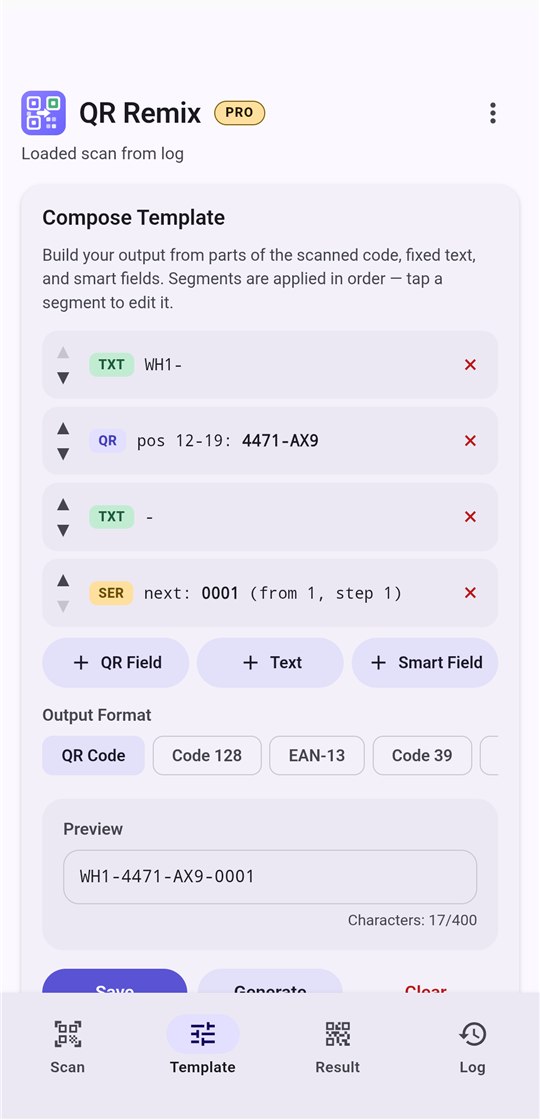
Each piece you add becomes a segment. Segments are joined from top to bottom, and the Preview box shows the result for the code you scanned.
If a segment is in the wrong place, use its ▲ and ▼ arrows. Tap a segment to change it, or tap its × to remove it.
The screenshot also shows an extra dash and a serial number segment, which is a Pro feature described under Smart Fields. You do not need those two segments for this example.
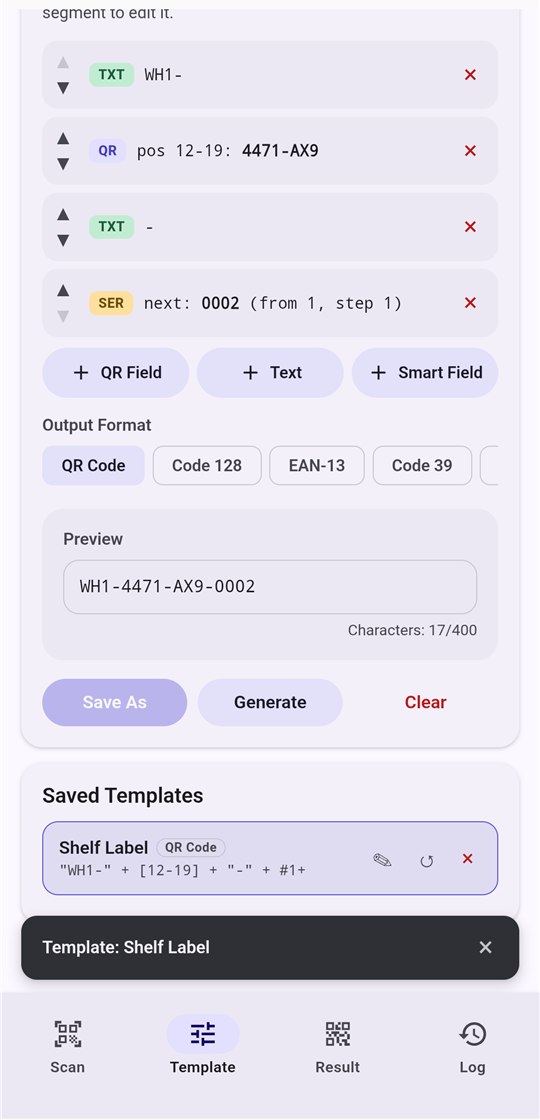
Shelf Label, and tap Add.The template is saved and becomes the active template straight away. Its name appears in the dark bar above the tabs.
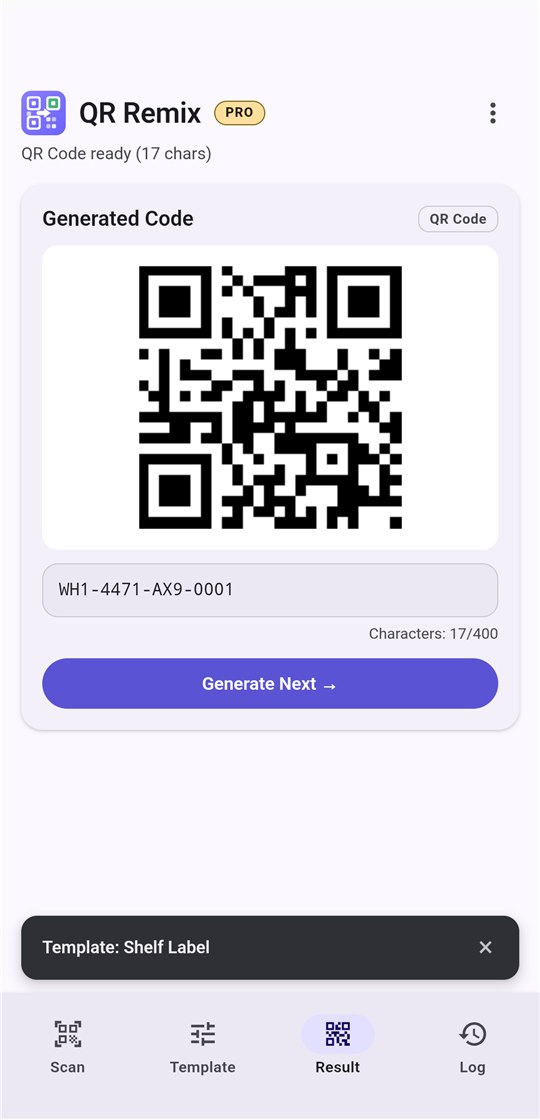
Go back to Scan and scan the next supplier code. Because a template is active, QR Remix applies it immediately and opens the Result tab with the new code.
From here on, every scan is one step: scan, and the converted code is on screen. Tap Scan Again for the next item.
To convert the sample you already scanned without scanning it again, tap Generate on the Template tab.
Getting a clean read, including in poor light or from a distance
Tap Start Scanning on the Scan tab. The first time, Android asks for permission to use the camera; QR Remix cannot scan without it. The camera opens full screen with a frame in the middle. Hold the code inside the frame and keep the phone steady — focusing is automatic.
When a code is read, the phone beeps, the camera closes, and the button changes to Scan Again. To leave the camera without scanning, tap × at the top right.
If your phone's camera supports them, two controls appear at the bottom of the camera screen:
Either way, the scan is recorded in the log.
The free version scans QR codes. QR Remix Pro also scans Code 128, EAN-13, Code 39, ITF, and UPC-A barcodes.
A template is a recipe: a list of segments joined in order
A range of characters copied from the scanned code — for example characters 12 to 19. The same positions are taken from every code you scan.
Fixed characters that are always the same: a prefix, a suffix, or a separator such as a dash.
A value QR Remix fills in each time: a serial number, the current date or time, or a random ID.
The + QR Field button becomes available once you have scanned a code, because you choose the range by tapping on real characters. Tap the first character, then the last. To keep a single character, tap it and then tap Add. If you tap the end before the start, QR Remix swaps them for you.
pos 12-19 takes the 13th to the 20th character.
The Preview box shows what the template produces for the code you last scanned, with a character count. Until a code has been scanned, QR Fields contribute nothing to the preview. The finished output is limited to 400 characters; anything beyond that is cut off.
Values that QR Remix fills in fresh every time a code is created
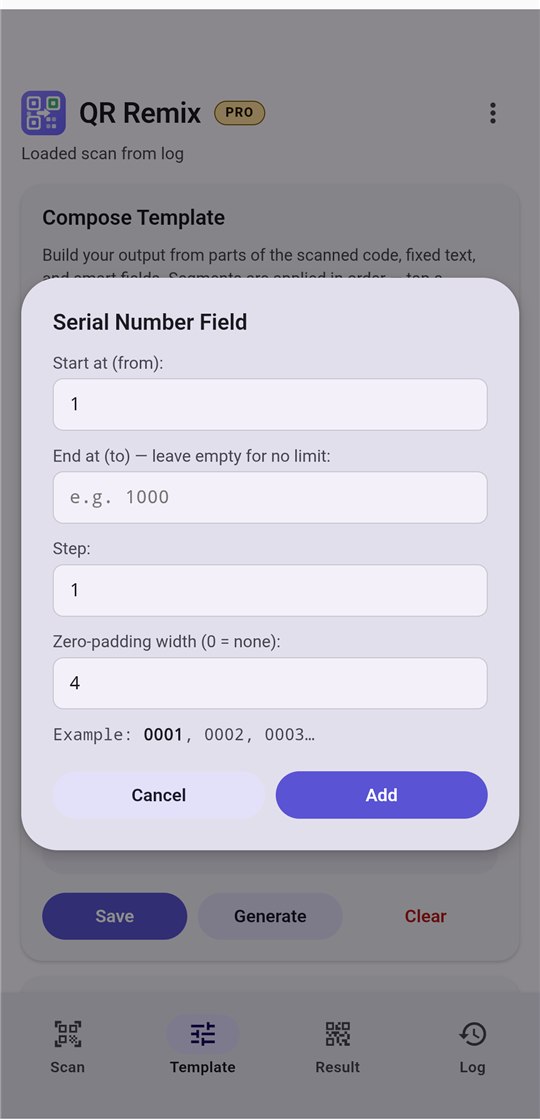
A counter that moves forward by one step each time a code is generated — the tool for numbered labels.
0001.The dialog shows the first three numbers as you type, so you can confirm the settings before adding the field.
Inserts the current date or time from your phone's clock. Choose one of the ready-made formats, or type your own pattern using these codes:
| Code | Meaning | Example |
|---|---|---|
YYYY | Four-digit year | 2026 |
YY | Two-digit year | 26 |
MM | Month, two digits | 03 |
DD | Day of the month, two digits | 09 |
HH | Hour, 24-hour clock | 14 |
mm | Minutes (lower case) | 05 |
ss | Seconds (lower case) | 30 |
Anything else in the pattern is kept as typed, so YYYY-MM-DD gives 2026-03-09 and YYMMDD gives 260309. Capital and lower-case letters matter: MM is the month and mm is minutes.
Inserts a new string of random characters each time. Set the length (1 to 64 characters) and choose the characters to draw from: letters and digits, digits only, or letters only. Random IDs are suitable for telling items apart at a glance; they are not guaranteed never to repeat.
Keep one template for each code format you work with
Saved templates are listed at the bottom of the Template tab. Each one shows its name, its output format, and a short summary of its segments.
| To do this | Do this |
|---|---|
| Make a template active | Tap it. It is highlighted, loaded into the editor, and named in the bar above the tabs. |
| Stop using the active template | Tap × on the active template bar. Scans then show the decoded text only. |
| Change a template | Tap it, edit its segments, then tap Save As and keep the same name. |
| Rename a template | Tap the pencil icon. Its serial counter is kept. |
| Restart a serial counter | Tap the circular arrow icon, shown on templates that contain a serial number. |
| Delete a template | Tap its ×. An Undo bar appears for about six seconds. |
QR Remix remembers the active template when you close the app, so the next time you open it you can start scanning straight away.
What you get, and which kind of code to choose
The Result tab shows the generated code, the text inside it, and its character count. Hold the phone up to another scanner to read the code straight from the screen. To keep or print a copy, take a screenshot.
When the template contains a serial number, a Generate Next → button appears under the result. Each tap produces the next code in the sequence from the same scanned text, so you can step through a numbered batch without rescanning.
Under Output Format on the Template tab, choose what kind of code the template produces. The format is saved with the template. QR Code is free; the barcode formats need QR Remix Pro.
| Format | What the text must be |
|---|---|
| QR Code | Any text, up to 400 characters |
| Code 128 PRO | Most keyboard characters; best kept short so the barcode stays scannable |
| EAN-13 PRO | 12 or 13 digits |
| Code 39 PRO | Capital letters A–Z, digits 0–9, space, and - . $ / + % |
| ITF PRO | Digits only, and an even number of them |
| UPC-A PRO | 11 or 12 digits |
If the text does not fit the chosen format, no barcode is drawn and a message such as Content is not valid for EAN-13 (requires 12–13 digits) is shown instead. Adjust the template so that its output matches the rule in the table.
A record of every scan and every generated code — and a way to reuse them
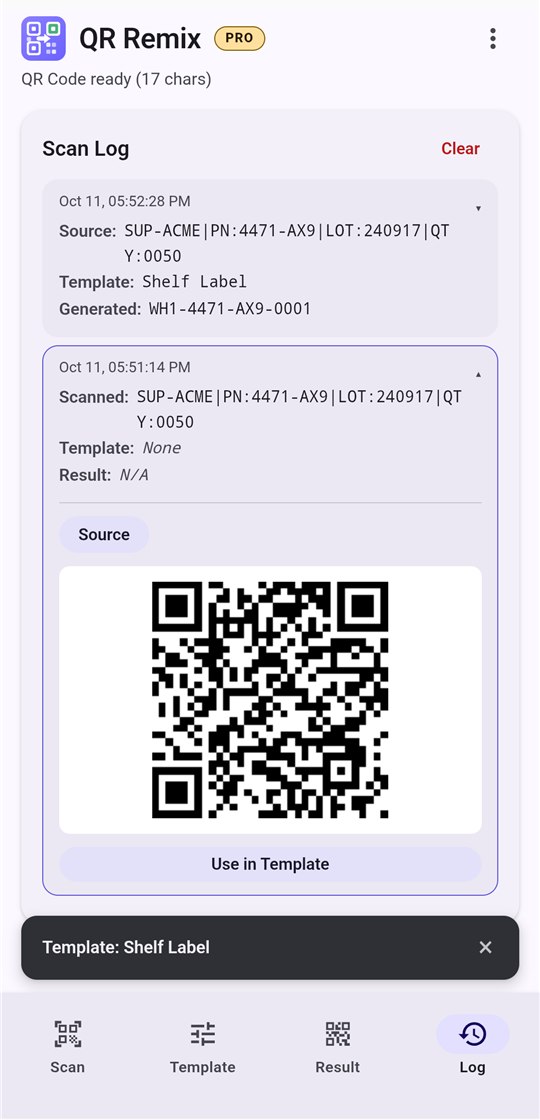
The newest entry is at the top. What each entry shows depends on where it came from:
Tap an entry to open it and see the actual code. Use the Source and Result or Generated buttons to switch between the original code and the new one.
Open an entry and tap Use in Template. The logged text is loaded exactly as if you had just scanned it:
This is the quickest way to try a new template against codes you scanned earlier, or to regenerate a label without having the original item to hand.
The Clear button does one of two things, and asks you to confirm either way:
QR Remix Pro is a one-time purchase, not a subscription
| Feature | Free | Pro |
|---|---|---|
| Scan QR codes | ✓ | ✓ |
| Templates with QR Fields and fixed text | ✓ | ✓ |
| Generate QR codes, with or without scanning | ✓ | ✓ |
| Saved templates and scan log | ✓ | ✓ |
| Scan barcodes (Code 128, EAN-13, Code 39, ITF, UPC-A) | — | ✓ |
| Generate barcodes in those formats | — | ✓ |
| Smart Fields: serial numbers, date & time, random IDs | — | ✓ |
| Serial batch runs with Generate Next | — | ✓ |
| Advertising | A full-screen ad after every third scan | None |
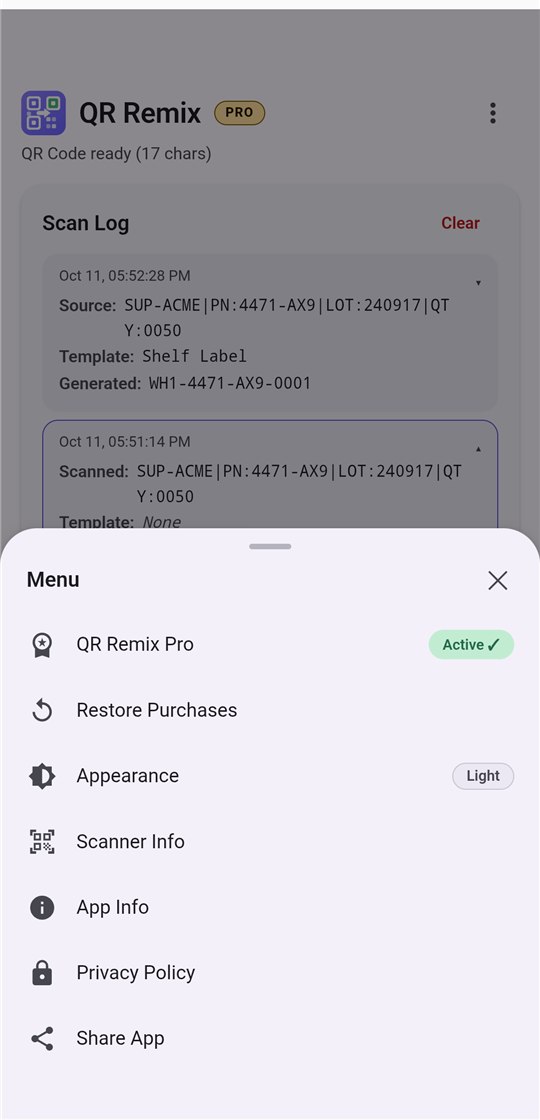
Open the menu and tap QR Remix Pro, or tap any feature marked PRO. The price for your country is shown before you confirm, and payment is handled by Google Play. Pro features switch on immediately and a PRO badge appears next to the app name.
If you reinstall QR Remix or move to a new phone, open the menu and tap Restore Purchases. Make sure the phone is signed in to Google Play with the account that bought Pro, and that it is online.
Tap the three dots at the top right
Where your templates and scans are kept
Templates, serial counters, and the scan log are stored on your phone. Scanning, applying templates, and generating codes all happen on the device and work without an internet connection.
For full details, see the QR Remix privacy policy.
Common problems and how to fix them
QR Remix needs permission to use the camera. Open Android Settings → Apps → QR Remix → Permissions → Camera and choose Allow only while using the app, then return to QR Remix and tap Start Scanning. You can confirm the permission under Menu → Scanner Info.
Hold the phone steady with the whole code inside the frame, and move a little closer or further away until the image is sharp. In poor light, turn on the flashlight. For a small or distant code, use the zoom slider. Wipe the camera lens if the image looks hazy, and avoid glare on glossy labels by tilting the phone slightly.
The free version scans QR codes only. Scanning Code 128, EAN-13, Code 39, ITF, and UPC-A barcodes is part of QR Remix Pro. Other barcode types are not supported.
A QR Field is chosen by tapping characters in a scanned code, so the button is only available after a scan. Scan a sample code first, or open a past scan in the Log and tap Use in Template.
QR Fields copy fixed positions. If the code you scanned is laid out differently from the sample the template was built on — a longer supplier name, a missing field — the positions no longer line up. Build a separate template for that code format, and activate the right template before scanning.
Each barcode format accepts only certain text; for example, EAN-13 needs 12 or 13 digits and ITF needs an even number of digits. Check the rules under Results and output formats, then adjust the template or switch its output format to QR Code, which accepts any text.
The counter moves forward every time a code is generated with that template, including test scans. To start over, tap the circular arrow on the template in the Saved Templates list. The serial segment in the editor always shows the number that will be used next.
QR Remix keeps the first 400 characters of a scanned code, and limits generated output to 400 characters as well. Longer content is cut off at that point.
Tap Undo on the bar that appears under the Saved Templates list. It stays for about six seconds; after that the template cannot be recovered and has to be built again.
Open the menu and tap Restore Purchases. The phone must be online and signed in to Google Play with the same Google account that made the purchase.
Email sunmarcs@gmail.com. It helps to include the details from Menu → Scanner Info and, if you can, an example of the code you are working with.
QR Remix is free on Android. New to the app? Start with the QR Remix overview.
Get it on Google Play